Ai-Fi Cookbook
Ai-Fi Central Main
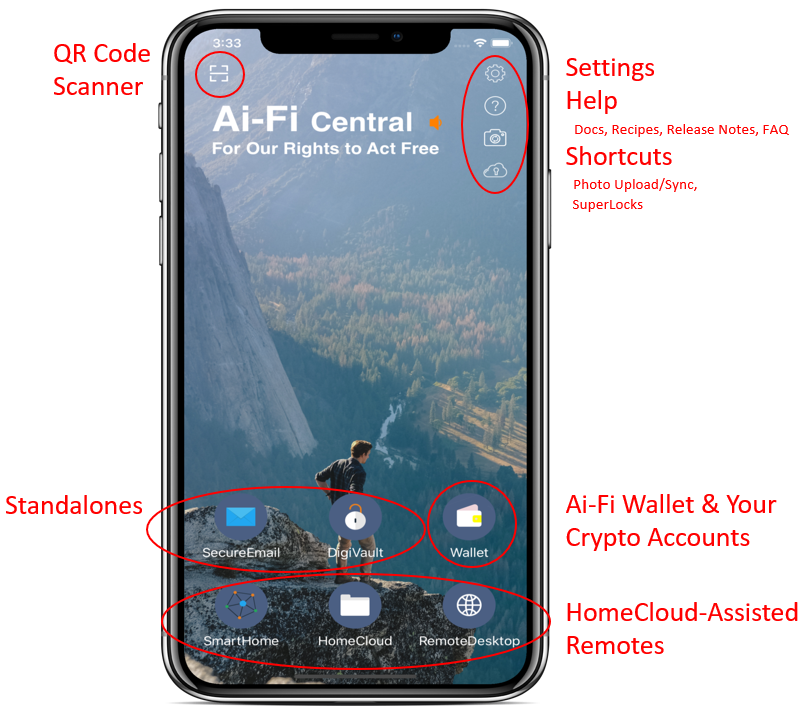
This is the Main display ("Main") of Ai-Fi Central where all other functions are rooted on.
Ai-Fi CookbookAi-Fi Central MainTo Sign-Up (or Not to Sign-Up)No Sign-Up Required?User Identities in Social NetworksBind to Ai-Fi Blockchain RegistryGmailOutlookAol & YahooOthersPay with CryptocurrenciesAcquiring AnonymityExtend Ai-Fi Central to PCsInstall Ai-Fi Desktop ApplicationsRun Integrated Ai-Fi AppsPhoto/File Access and SyncDistributed Social NetworkingVideo ConferencingHomeServerInstall HomeCloud on Raspberry PiDiscover Home Servers in Local LANShare Someone Else's Home ServerGrant Access to New UsersShare Files to Other UsersPhotos Upload/Archive in Real TimeWhere are the Documentations?Upload PhotosTrigger the Initial Archive Function AgainArchive/Backup Photos to a USB DeviceGo Incognito with Ai-Fi CloudManage Secret Krypton TokensMulti-Share Secret DistributionBitcoin/Crypto-Wallet Seed PassphrasesLock Secrets into Ai-Fi Incognito CloudSplit the Secret into Multiple PartsCounterseal Wallet & Threshold SignatureWallet RecoveryRecover from Losing Your PhoneRecover After Deleting the AppChange Wallet Recovery OptionDigiVault Backup and SyncAuto-Sync to an Hosted Krypton TokenExport/Import DigiVault DatabaseSecureEmailBind Your Email AddressesSend Email to Non Ai-Fi RecipientsAnonymize thru Cover AddressArchive your SecureEmail KeysArchive your SecureEmail ContentsHome ServersDownload and Install the HomeCloudAllow Access to Friends & FamilyPublish Your Web Page"Private" IoTIntegrate Smart Home IoT Devices
To Sign-Up (or Not to Sign-Up)
No Sign-Up Required?
Ai-Fi.net maintains no records or accounting on individual users; hence there is no sign-up required.
Instead, your requests for various Ai-Fi services are fully anonymous involving only a few PKI key pairs you maintain in your Ai-Fi Central app for the express purpose of service payment, much like that in Bitcoin trading. Your fees to Ai-Fi.net, when required, are transacted through those crypto accounts dedicated to their specific functions without the known risk of de-anonymizing heuristic attacks in Bitcoin. It is not tied to any of your PII (Personally Identifiable Information) and with the Tor Onion Routing option not even to your IP addresses.
User Identities in Social Networks
While by design there is no need to be represented by an account in dealing with Ai-Fi.net, in almost all other social interactions the participants do need to be represented with some appropriately defined identity. As the SecureEmail is an integral part of Ai-Fi.net, all SecureEmail addresses are published on the "Ai-Fi Blockchain Registry", which resides physically on the Stellar Blockchain and is fully transparent. Each entry, namely the associated SecureEmail address, is vetted by Ai-Fi.net by requiring the original requester to demonstrate its ownership of the email address when it is initially entered into the registry. The requester, or the owner of the email address, is then allowed to attach a cryptographic key pair from their Ai-Fi Wallet with the entry. After their creations, all transactions or changes affecting their ownership or associated resources (such as the location pre-key store) are publicly disclosed on the same blockchain registry and monitorable publicly by all visitors. Only the owner with verifiable possession of the key pair is allowed to make modifications.
Bind to Ai-Fi Blockchain Registry
To all the popular email service providers, the Ai-Fi SecureEmail app is considered a 3rd party email client, through which you access your emails stored with your chosen email provider like gmail, outlook, aol, yahoo, etc.. To protect the security of your emails and to avoid any 3rd parties misusing your password or other credentials, your email providers typically require the 3rd party to follow the OAuth2 standard for email access authorization, which requires them to go through the OAuth2 certification process. Ai-Fi Central is committed to this standard, which takes time to conform. For now, we only work with those email providers as a "legacy" app and ask the users to allow us to use their password to sign in, except for gmail, which permits us to run pre-certified OAuth2 (with lots of warning messages). Please look for the appropriate sections below for working with your email provider.
Gmail
If you choose to bind a gmail mailbox to Ai-Fi, the binding process is actually done through OAuth2 except that our implementation is not yet certified. For now, answer all gmail questions correctly and ignore all warnings about the fact we are not yet established as a recognized Google application. The bind would succeed if your Google credentials are correctly entered. On your gmail client on PC, there will be two "Security alert" messages.
Outlook
For accessing outlook email service, use your Outlook password to login. Depending on how you've described your profile and the security specification you've defined for your Outlook account, you may need to answer a few questions on your outlook client, upon receiving a security notification from Outlook, at your PC to authenticate your access from Ai-Fi SecureEmail.
Aol & Yahoo
Before we complete the OAuth2 certification with Aol or Yahoo Mail, the only option is to use an "app specific password" to log into their email services. It is a long, randomly generated code that gives us permission to access your Yahoo or Aol account. The step for generating it is well documented at Generate and manage third-party app passwords. (Specifically, for Aol Mail, go to inbox, select "Options" on the upper right under account ID, select "Account Security", select "Manage app passwords", select "Other App", and create "custom name" to identify this instance of app, and finally "Generate". For Yahoo!mail, select "Account Info" under your Yahoo account ID on the upper right, select "Account Security", log in if required, and follow the "Manage app passwords" instruction path. The rest is similar to the case for Aol Mail.)
Others
For other email services, if your entering the password doesn't get you through your email service, you may need to specify many complicated questions specific to your email server, including possibly the nonstandard IMAP ports and server address. As mentioned previously, it may not be to your advantage to stick to your old email address, which most likely has been "pwned" and unquestionably would lead back to all your other cyber footprints in the past. Adopting a new email address may be in order.
Pay with Cryptocurrencies
Consistent with its privacy focus and the aversion to any apparatus incurring possible trackability, even without requiring user sign-up, Ai-Fi.net collects service fees only through cryptocurrencies per service requests, which also enables our fee collecting scheme for the microscale. If you are not experienced in cryptocurrency, this is the opportunity to get your feet wet with very limited financial exposure. With the governments worldwide printing paper money like there's no tomorrow, diluting our wealth without representation, cryptocurrencies will be increasingly critical in their role of protecting our financial interests.
During the installation and trial-out period for Ai-Fi Central, an expense of around 10 Stellar Lumens/XLMs (less than $1) is incurred to "bind" one of your email addresses to the Ai-Fi Blockchain Registry during the SecureEmail start-up process, which becomes your Ai-Fi identity. This expense goes to Stellar Open Network for establishing ownership of your email address on the Stellar blockchain inexpensively and permanently (immutability in the Blockchain lingo). The rationale behind this registration requirement is explained in great length in our blog "How Secure Is Your Secure Email".
There are many channels available to purchase Stellar XLM coins. For example, sign up for an account with Paybis and use your personal debit card, you can instantly purchase XLMs (minimal purchase of $15). Use the Stellar ID/Address copied from one of the Ai-Fi Central installation steps to receive it. These first 10 XLMs are non-recurring charges to establish your first Ai-Fi SecureEmail "identity" on Ai-Fi Blockchain Registry. Once purchased and received, the remaining coins can be moved around freely. Any future "re-binding" will incur half of the charges, such as in the case of losing your mobile phone or accidental deletion of Ai-Fi Central app and losing the recovery passphrase. The binding to a new SecureEmail address would incur the full 10 XLMs if never used before.
Acquiring Anonymity
If the binding is for a "burner" email address, you may want to do a bit more work in procuring your Stellar XLM coins anonymously. Otherwise, your SecureEmail address would be linked to some of your PII through the first payment in purchasing the crypto coins. There are plenty of tips around on the web for this purpose, including digital currencies such as Monero, DASH and Verge. For a small amount, find a Bitcoin ATM which skips verification.
Please be cautioned that cryptocurrencies in general are on the radar of many government agencies, with Monero and its ilk more so than others. Engage in this anonymization effort only to protect your privacy, not to commit illegal activities.
Extend Ai-Fi Central to PCs
Install Ai-Fi Desktop Applications
When it comes to security, portability, sandboxing, authentication and many other mobile benefits, the smart phones are hard to beat. However, there is a lot to be desired when they are used as input devices or display screens for more demanding desk jobs. For those heavy liftings, Ai-Fi Central can be assisted by installing and running an extension software on popular PC platforms such as Windows or Macs:
- Go to Ai-Fi.net webpage >> select "Get Started" from top menu bar >> "Downloads & Installations"
- Go to "Ai-Fi Desktop" and select the appropriate installation package per your PC platform.
- Install the package.
Run Integrated Ai-Fi Apps
Photo/File Access and Sync
Distributed Social Networking
TBD.
Video Conferencing
TBD.
HomeServer
Install HomeCloud on Raspberry Pi
Go to the ai-fi.net download page to get the pre-built micro-SD image of Ai-Fi Home Cloud to be running on your Home Server. The recommended minimum size is 32G. Since your HomeCloud will host many of your files, including photos and videos flowing out of your mobile phones or pads as backups, you may want to acquire a SD with sufficient capacity based on your current and future needs. It is a lot more cost effective than to upgrade the storage for your phones.
The installation involves multiple steps and is detailed out in a separate document.
Discover Home Servers in Local LAN
By "local", we indicate those servers reachable from the local LAN behind the same firewall, which affords the users extra protection by taking advantage of the physical proximity of co-located devices and the shared firewall.
TBD
Share Someone Else's Home Server
You must have successfully sent/received SecureEmails from the owner of the home server in the past.
Contact the owner to solicit an invitation for accessing their home server through SecureEmail.
Once the invitation is received:
- Find out the domain name of the home server, which is in the format of someone-else.ai-fi.me.
- Enter the domain name in the Settings and activate it. Once successfully activated, all your interactions with the home server will be carried out through the "Ai-Fi HomeCloud".
Grant Access to New Users
The Home Server relies on an ACL (Access Control List) configuration for administering remote user accesses. The granting process is protected by enforcing the authentication protocol established through the SecureEmail fortified with the TOFU mechanism. Only Admin may grant access to new user accounts.
Each user with granted access rights may maintain certain resources on the Home Server, such as storage space for their files and management functions including the sync capability covering multiple servers and PCs, federated identity based on the Home Server, and access to a broad line of social networks based on federated Home Servers.
To register with a Home Server for any access right, the applicant must be known to the administrator of the Homer Server or have been recognized and acknowledged by the administrator through the TOFU protocol, which basically implies a successful email exchange with the administrator in the past. The administrator notifies the access privilege to a particular user by sending them a secured invitation email:
- Ascertain a successful email exchange with the administrator, which requires the successful exercise of the TOFU protocol.
- Contact the administrator to communicate the desire to share their HomeServer resources.
- If the applicant is on the trust list through successful exchange of SecureEmails in the past, the administrator adds the applicant to the ACL.
- The administrator sends an invitation SecureEmail to the approved applicant.
- The applicant may start taking advantage of those HomeServer resources explicitly allowed on the ACL.
Share Files to Other Users
Nextcloud is one of the most important third-party applications integrated into the various Ai-Fi.net packages. The integrated package relies on Ai-Fi.net for pseudonymity, ACL (access privileges), HomeServer bundling, and most importantly secure network addressability thru Ai-Fi DAP (Domain Access Proxy). Found out more about these foundational supports built into Ai-Fi.net in this document.
For specific Nextcloud functions, the best way to learn is to visit https://nextcloud.com, and the easily accessible menu at https://docs.nextcloud.com/desktop/2.6/index.html.
All files relevant to the daily operation of Nextcloud are collected under the "Nextcloud folder", which may be replicated and synchronized across many different devices, each having its own flavor of folder/file interfaces. We use the Windows interfaces as an example, presuming the Ai-Fi Desktop for Windows is running (in the background) after its proper installation:
Go to the system tray of Windows looking for Nextcloud icon

Right-click on the icon and select either one:
- Open Nextcloud in browser
- Open folder "Nextcloud"
Both display the list of files currently under the Nextcloud folder.
Select the files to "share", click on the standard sharing icon and follow the instructions. Alternatively, under the folder "Nextcloud" the file in the list may be right-clicked to get the "share" function.
Photos Upload/Archive in Real Time
Where are the Documentations?
Photos is just a type of file that is mostly used on your mobile phone and quickly accumulates to an unmanageable volume before you know it. The management of your photos in terms of their offline storage, backup schedules, and on-demand retrievals are hugely profitable revenue generation opportunities.
For managing your photos, Ai-Fi integrates the Nextcloud open source into its foundational services and offers the following:
- Use of the private/personal HomeCloud servers for off-phone storages.
- On-line access of your HomeCloud 24X7 if your Internet connectivity is reliable; additional redundancy support may be obtained by adding extra servers.
- All meta-data regarding your photos are hidden and secured, through Tor Onion Routing and anonymous access without relying on any third parties such as iCloud or Google Cloud.
All other specific interfaces to the off-device storage and sync functions are adopted directly from Nextcloud.
Look into the various Ai-Fi documents and blogs for Ai-Fi infrastructure. For specific interfaces through Nextcloud, please visit https://nextcloud.com.
Upload Photos
"Photo upload" takes advantage of the third-party "NextCloud" open source running under the Ai-Fi infrastructure. Your email address is used to identify your participation. Please find out more about the server where the HomeCloud/NextCloud runs on here.
Through the shortcut to manage your photos:
 Tap the photo upload shortcut, which is a quick link for setting up some photo options for the HomeCloud, the full function of which may be accessed through the application HomeCloud on the main screen.
If this is the first time accessing the HomeCloud, answer the prompt for where the Home Server is.
This shortcut is preconfigured with the "auto upload" option turned on. Due to the potential large volume for the first time, you will be asked if all existing photos in your photo album are to be uploaded. If yes, an "archive" will be prepared in the HomeCloud app to keep track of the upload process, which takes a while. The archive will remain with the HomeCloud app to keep track of those photos already uploaded to your Home Servers. The photos managed through this Home Server "archive" correspond to those in the Home Server and are independent from the photo albums on your mobile phone.
In this shortcut for uploading photos, a few settings are pre-configured. For instance, the default mode is pre-selected as "auto upload in the background". To overwrite the defaults:
- Enter the upload screen from the photo-upload shortcut on Main
- Press the lower right "More" (hamburger) icon
- Press "Settings"
- Press "Auto upload" to adjust your options
Note that if the "archive" building process is disrupted before completion, the old photos taken in the past may not be uploaded completely. Only a re-initiation of the archive process may re-fill the archive with missing historical photos.
Once the uploading completes, the photo "archive" on your phone is directly tied to your photos on the specified Home Server. Deleting photos from your album on your phone does not impact those in your archive.
The "archive" contains all the "metadata" needed to maintain the mapping between photos on your phone and those uploaded to your HomeCloud, including a snapshot for each photo. It functions as a "cache" and sometimes keeps a copy for certain photos already uploaded when cache spaces allow it, in addition to the snapshots, for ease of direct viewing from your phone. Its usage of storage space may seem bloated (viewed from iPhone Settings >> General >> iPhone Storage). This space used for photo cache may be cleared by:
- Enter the upload screen from the photo shortcut on Main
- Press the lower right "More" (hamburger) icon
- Press "Settings"
- Press "Advanced" settings at about the end
- Use "Clear cache" to eliminate all cached photos. After that you will see the storage space usage statistics reduced immediately.
- Use "Disable local cache" to cancel the cache function. After that any photo display request will trigger a download from the HomeServer.
To take one step further in order to backup your photos to an external USB drive, follow the steps here.
Trigger the Initial Archive Function Again
Once passed the initial "archiving" phase for existing photos on your phone, only newly captured photos will be uploaded to the Home Server. The disposition of those photos on the Home Server is reflected accurately through their "archive" on the mobile phone and may be managed through the archive as well. Deletion from the archive would remove the photo from the Home Server without affecting the local copies of their counterpart on the mobile phone.
To refill or reload all local photos to the Home Server after the first "auto upload":
- Enter the upload screen from the photo shortcut on Main
- Press the lower right "More" (hamburger) icon
- Press "Settings"
- Turn off the "Auto upload".
- Go back again to the Ai-Fi Central main display and tap the camera shortcut. The system would ask if you want to turn on the "Auto upload", turning on which would fill the "archive" with photos missing in the Home Server and upload those missing ones anew.
Archive/Backup Photos to a USB Device
A popular function is to archive/backup your photos from your mobile phones to an external USB drive for safekeeping. The photo upload shortcut on Ai-Fi Central Main only manages to upload the photos from the mobile phone to the designated Home Servers. To take one step further and copy those photos to a USB device, the suggested approach is to run the Ai-Fi Desktop app on your favorite PC and apply the sync function so that the photos in the photo "archive" on your mobile phone, and those in the designated Home Servers, plus the photos in "Nextcloud" folder on your selected desktop for sync purposes, are all synchronized and maintain the same photos. After the sync functions are arranged, wait until the sync completes and then copy the files in the synced photo folder on your PC to the external USB drive.
A suggested archive/backup of your photos to an USB device:
- Bring up the Ai-Fi Desktop App on the PC platform most convenient to you.
- Identify from the home server list the one where the photos from your mobile phones are uploaded to.
- Select the "HomeCloud Sync" icon from the Admin Tools, which will bring up the native Nextcloud specifically for the sync functions. The "Photos" folder should appear in the list as part of the "sync connection."
- Once the Photos folders on all devices are synced up, load the photos to the USB drive for backup. In Windows, it defaults to the folder c:\users\your-Windows-id\Nextcloud\photos
Go Incognito with Ai-Fi Cloud
There are two documents giving more details on how to safekeep your secrets through Ai-Fi:
- "Secrets in Plain Sight", documenting the anonymous cloud services offered by Ai-Fi.net.
- "SuperLock", documenting the upper layer construct utilizing different secret keeping mechanisms through the Ai-Fi Central on your mobile phones, the Ai-Fi Incognito Cloud, and your private HomeServer.
Manage Secret Krypton Tokens
Ai-Fi Secret Tokens are data blobs that are not only privately encrypted but also totally untraceable to their original owners. It turns the public Ai-Fi cloud into a private repository. It is popularly used for anonymously storing passwords, mnemonic passphrases, and many other secret texts.
To manage the Incognito tokens:
 Tap the SuperLock shortcut on Main.
- Select "Ai-Fi Krypton Tokens in Incognito Cloud".
- "Creating New Tokens" or "Editing Tokens" per your needs. Identify the tokens by entering your private email address (as salt) and a Passphrase (of minimally 100-bit entropy), which uniquely defines/identifies the token containing multiple content sections indexed by their "labels".
The creation, admin, and payment for Ai-Fi Krypton Tokens are anonymous, impervious even to Ai-Fi.net as a service provider.
Multi-Share Secret Distribution
TBD
Bitcoin/Crypto-Wallet Seed Passphrases
Ai-Fi.net provides a number of ways for keeping your seed passphrases safe. Those protection schemes are designed for protecting any text files, not needing to conform to BIP39, BIP44, or any other crypto-wallet standards. Many cryptocurrency owners find Ai-Fi's SuperLock highly useful as an alternative to keeping the secret passphrase on paper. Bitcoin is indicated here for its popularity. The tools described here apply to many other crypto-wallets. Learn more about Ai-Fi Tokens and Multi-Share Secret Distribution here.
Lock Secrets into Ai-Fi Incognito Cloud
The complete passphrase may be stored as an Ai-Fi portable token:
- Tap the SuperLock shortcut on Main.
- Select "Ai-Fi Krypton Tokens in Incognito Cloud".
- "Creating New Tokens" if the secret is to be entered into a new portable token, or "Editing Tokens" if to be part of an existing token.
- Enter your secret texts, email, token passphrase and a label for the newly entered secret.
If you are not comfortable in writing down your secret on a piece of paper but not ready to commit it to the Ai-Fi Incognito Cloud, there is a mechanism below that splits your secret into multiple independent parts and stores them separately.
Split the Secret into Multiple Parts
The technology behind the "Multi-Share Secret Distribution" or "Shamir's Secret Sharing" is detailed in a separate help document.
- Tap the SuperLock shortcut.
Select "Multi-Share Secret Distribution".
Give your secret to be transformed into a multi-share secret named "Multi-Share ID" and enter your secret text.
Although Shamir's Secret Sharing scheme allows splitting the secret into any number of secret shares (Recovery Keys), currently only 3 is allowed for simplicity.
- Key #1 is always stored locally with the Ai-Fi Central app.
- Key #2 and #3 may be stored as portable tokens to the Ai-Fi Incognito Cloud, exported as files, or simply displayed for copying purposes. Make sure they are kept separately away from the phone.
To recover the original secret from the same phone where the Ai-Fi Central runs on, you need one of the keys: Key #2 or Key #3, depending on how they are stored. In the unfortunate event that the phone is lost, you need both Key #2 and Key #3 to recover. In other words, losing one of the 3 keys will not defeat you.
Counterseal Wallet & Threshold Signature
There is a Ai-Fi utility specifically designed for the signing of Bitcoin transactions based on the latest Threshold Signature Technology involving two independent signing parties. The Krypton token foundational support greatly enhances its usability, even when multiple software components running on separate platforms are involved.
Due to its specialized use case a separate document is provided.
Wallet Recovery
Recover from Losing Your Phone
Download and re-install a new version of Ai-Fi Central. Launch the app and select the "Recover ..." option on start-up screen.
If the original recovery passphrase was recorded on a piece of paper, you need to type the full version of the passphrase precisely as originally entered. If you lose your paper record, we can't help you recover it.
If the original recovery passphrase was saved as a Portable Token in Ai-Fi Incognito Cloud, enter the original Email Address used and the passphrase for the token. Once the token is retrieved, select the correct label originally entered to retrieve the recovery passphrase.
If the original recovery passphrase was protected by the Multi-Share Secret Distribution scheme or Shamir's Secret Sharing, you need the recover those two secret shares (Key #2 and Key #3 originally) not physically stored with the original phone.
If any of your crypto accounts is based on Threshold Signature with multiple signers, you need to take additional steps to recover those. Due to its complexity, please refer to its specific documentation.
Once the wallet is recovered, the keys for previous or older versions of Ai-Fi SecureEmails may be automatically restored by retrieving their Hosted Tokens from the Ai-Fi Incognito Cloud. Similar recovery is carried out for DigiVault as well if the Auto-Sync option was enabled.
Recover After Deleting the App
Same as losing your phone.
Change Wallet Recovery Option
DigiVault Backup and Sync
Auto-Sync to an Hosted Krypton Token
The DigiVault is physically hosted on your Ai-Fi Central app/phone. To avoid its loss, you may back it up to the Ai-Fi Incognito cloud as a hosted Krypton Token and keep it synced with your DigiVault app by:
- "Settings"
- Under "AI-FI DIGIVAULT", enable "Auto-Sync"
If you are not comfortable with the Ai-Fi Incognito Cloud, select "Databases Import/Export" under "AI-FI DIGIVAULT" to place it to any of your home servers.
Export/Import DigiVault Database
- Click on Ai-Fi Central Main "Settings" on the upper right.
- Under "AI-FI DIGIVAULT", enter into "Import/Export"
- A network link is displayed over a dark background, indicating the Ai-Fi Central is now dedicated for the "Import/Export" commands.
- Run the browser from a separate PC where you want to recover or store the DigiVault database files. Enter the network link displayed on the dark screen of Ai-Fi Central.
- On PC, the Ai-Fi Central upload/download/folder-management screen is displayed with a list of existing database files. Follow the on-screen instruction: "Upload" to recover an older version (typically) of the DigiVault, and the "Download" command icon to the left of the file to download from the Ai-Fi Central for backup or archiving functions.
- When completed on the PC, go back to Ai-Fi Central and exit the dark screen by pressing the "Stop" button.
SecureEmail
Bind Your Email Addresses
Ai-Fi Services adopts the Signal Protocol for establishing end-to-end encryption with future secrecy, which is considered stronger in strength in protecting the communication between end points than TLS. The identity of the end points of a Signal Protocol session is established by registering the owner of the email addresses to the Ai-Fi Blockchain Registry after ownership verification, without the need to trust the credentials issued by a third party Certificate Authority.
Send Email to Non Ai-Fi Recipients
You will be alerted when sending a SecureEmail to a non-Ai-Fi recipient. As the recipient lacks an Ai-Fi Wallet, an end-to-end secure channel is not possible to establish. However, Ai-Fi.net offers a temporary repository to store your email and will send a notification email to the recipient about your attempt. You need to prepare a "password" and communicate that to your intended recipient so they can retrieve the email confidentially by visiting the Ai-Fi repository with the password. Obviously the communication is no longer end to end. This mechanism is typically used to invite your friends to join the Ai-Fi community.
Anonymize thru Cover Address
Any emails sent to a cover address will be encrypted by Ai-Fi.net after reception and forwarded to the specified destination email address as below. Your email service provider will not be able to read it and the sender does not have a record of your private email address. If your email provider is Gmail, this would put a damper on its attempt to record all your shopping transactions, which go back as far as 15 years as widely reported.
Set up a confidential email address with an e-merchant:
- Enter into settings.
- Select "Mailboxes".
- Select the destination email address entry.
- Select "Cover Addresses"
- "+" to create a new cover address, which is a unique 12-char mailbox ID (local part) with the domain "ai-fi.net".
- Enter this newly created "cover address" to your e-merchants (e.g. amazon.com, target.com).
To further strengthen the safety of email delivery and avoid man-in-the-middle attacks, the email transport may be encrypted end-to-end if the sender (e-merchant) opts to run the Ai-Fi SecureEmail Enterprise Edition.
Archive your SecureEmail Keys
- Tap the SuperLock shortcut .
- Select "Secure Email"
- Enable "Auto-Upload keys"
Learn more about Secure Email Archive.
Archive your SecureEmail Contents
The keys for your SecureEmails are secured separately from their content, which are kept in the repositories of your email providers. A popular request is to archive those emails from your email providers before deleting them from the providers:
- "Settings"
- Under "AI-FI Mail", select "Emails Backup/Restore"
- TBD
Cleanly deleting those emails from your email providers is not always attainable. Go here to find out more about this issue.
Home Servers
Download and Install the HomeCloud
TBD
Allow Access to Friends & Family
 from Ai-Fi Central Main; provide PIN if requested
- Press "Home Server"
- Select the HomeServer you want to share and swipe left to bring up the "Deactivate/Activate, Share, Trash" menu.
- Select "Share" to enter the HomeServer sharing screen, which displays a list of email addresses of those people you have interacted with successfully through SecureEmail. Select from this list of truste
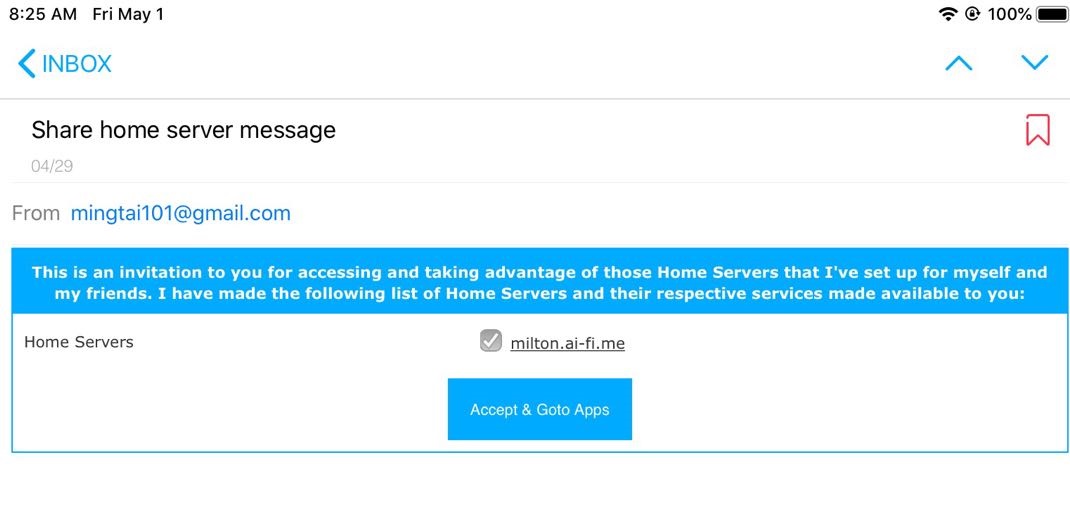
- d email addresses with whom you will share your data on the specified HomeServer. Ai-Fi Central will deliver an invitation email to those selected as below:
Publish Your Web Page
TBD
"Private" IoT
Integrate Smart Home IoT Devices
TBD